Happy Birthday to my Little Brother! Had fun with road signs and making a "hill"... The signs were paper but the cake was real...
Sunday, May 3, 2015
Sunday, April 19, 2015
Holy 200!!!
My 200th Blog entry is a cake I made for my Niece's First Holy Communion. She was so proud and excited for this day! She said she was waiting for this day since she was 5. As she told the story she kept getting younger... Since I was 4, Since I was in Pre-school... She is a comedian, that kid! Her mom reminded her I was making a cake earlier this week and her reply " ohhhh that's right, I'm kind of a big deal" Yes Lindsey, You are definitely a big deal...
Labels:
Buttercream,
Cross,
First Holy Communion,
fondant,
God Bless
Sunday, April 5, 2015
Furniture Makeover- Bar
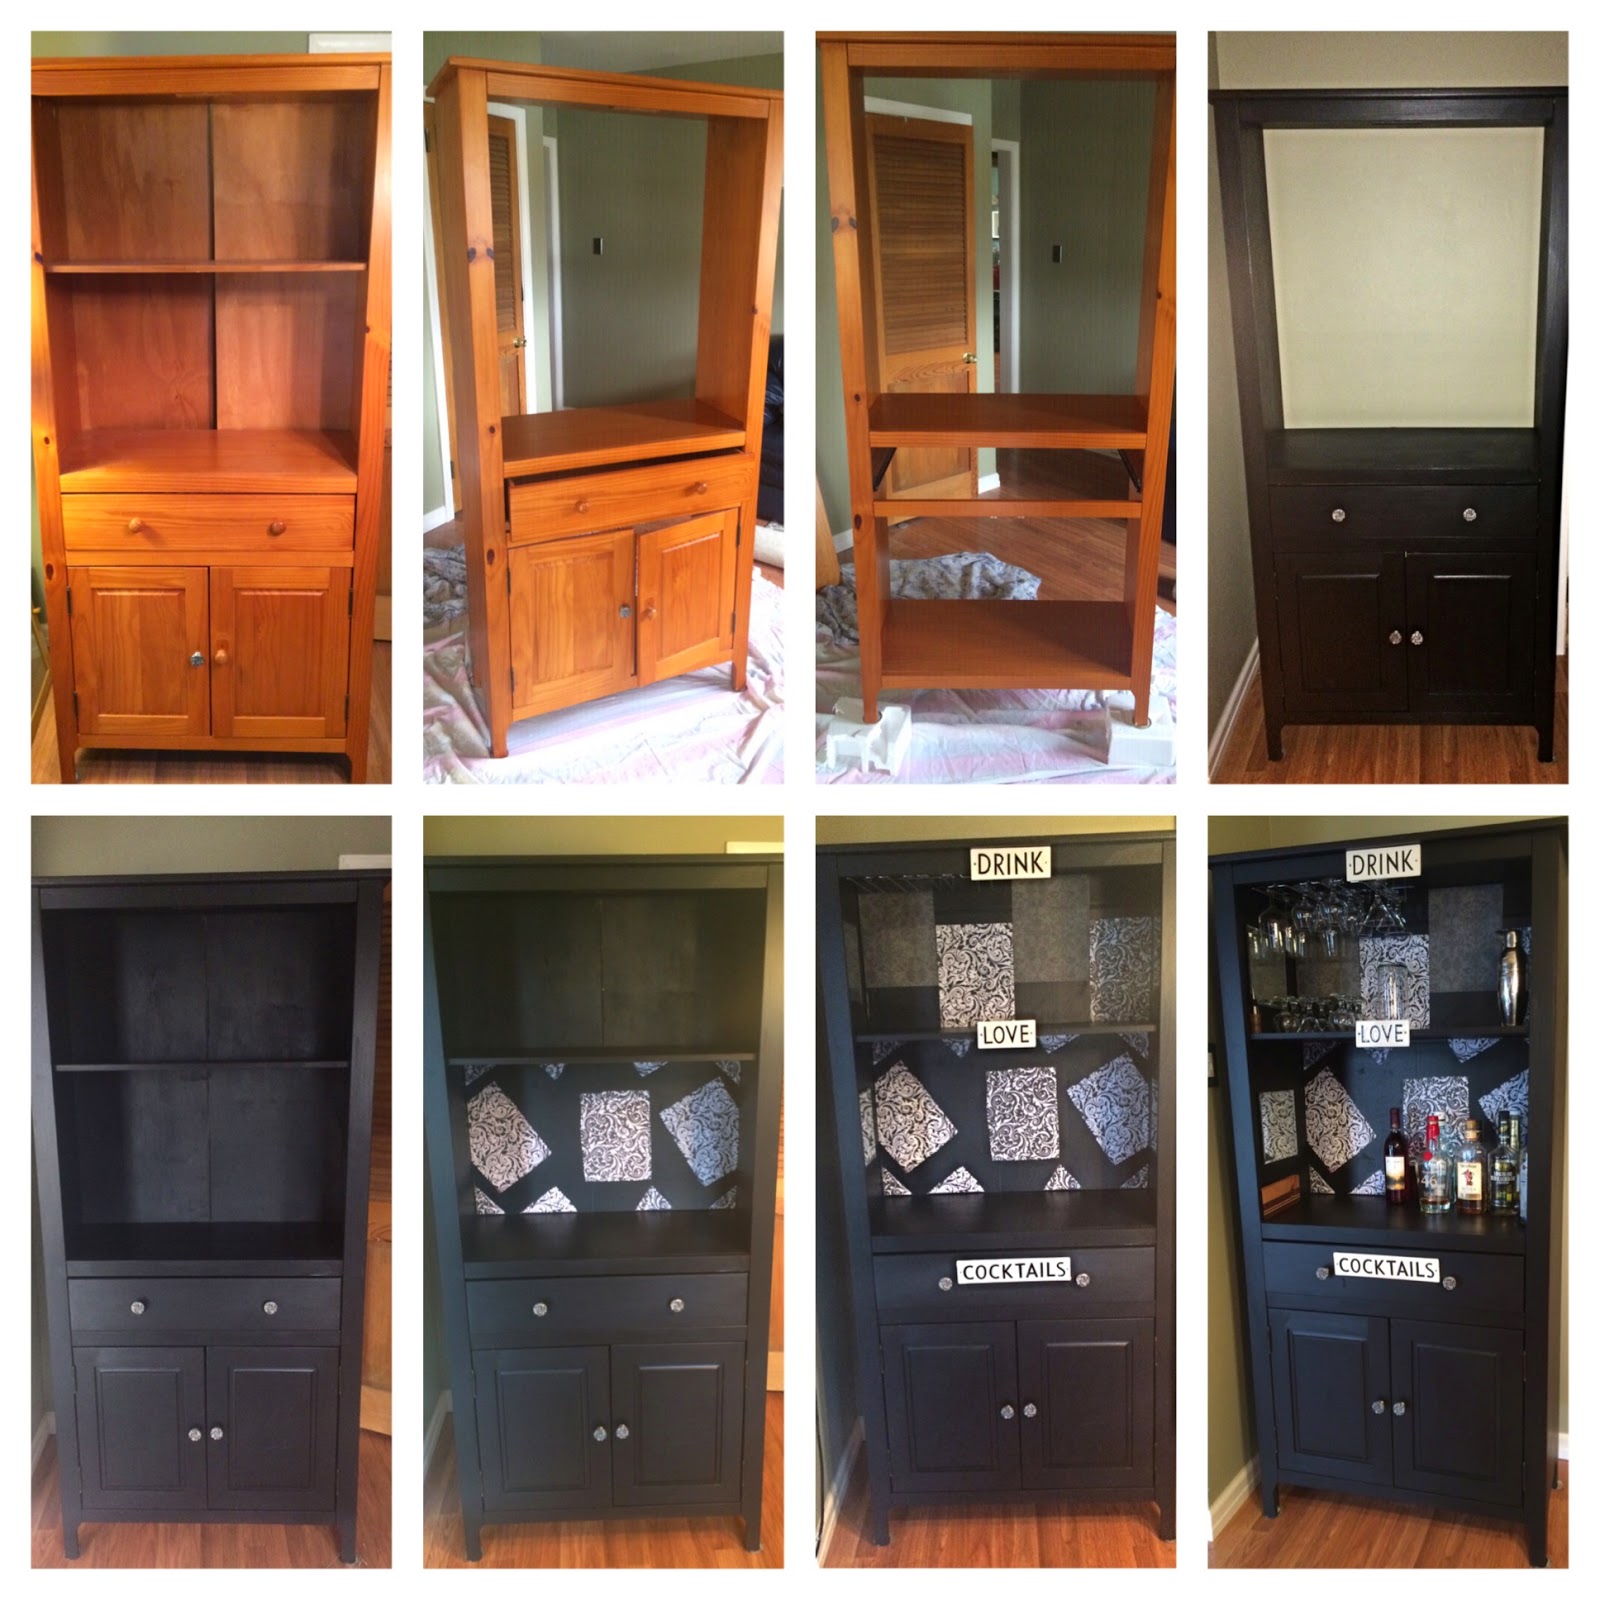
I'm interrupting my cake blog to show you my first furniture makeover. I'm so excited and proud that I did it! I took an old cabinet- I believe I bought it about 10 years ago when I was living in Conshohocken... It was an "assemble yourself" piece of furniture (I don't think it was Ikea but a similar brand) and surprisingly it has held up OK over the years. I've been surfing Pinterest for ideas and was inspired by many different ideas but never really found "The One"... So I just threw together a bunch of ideas and gave it a try.
The original piece of furniture had doors on the top row. For some unknown reason I didn't take a "before" picture ... I think I was just excited to get started!
Painting the Furniture
I used the techniques of painting furniture from the Vintage Store House. I really liked Kelsey's explanations- She is really nice and encouraging! I pretty much followed everything she said.
Here is the link:
http://www.vintagestorehouse.com/diy-furniture/how-i-paint-furniture/tutorial-how-to-eliminate-brush-strokes-on-furniture/
I used everything she uses in her tutorial Sherwin Williams Paint, Vintage Store House Chalk Powered, Sherwin Williams Brush, Fiddes and Son's wax...
I'm not sure the wax finish did much... I don't really see a difference but I did it anyway. Maybe over time it will be come evident why you need to do that step.
Back Board
The back of the cabinet was my most perplexing challenge. The two boards in the back were held together with a piece of plastic leaving about a 1/4 gap. I tried to shimmy a piece of wood in between but it wasn't flat. So I decided to cut up some black poster board I had and make two panels to fit into each level. I used scrapbooking paper to decorate the boards. I'm holding them in place by double sided tape so If I want to change the look of the bar I can... I'm sure I won't, but the option is there....
Finishes
I bought the Signs Drink, Love, Cocktails from a great store in Philly. I walk by it when I'm roaming the city but can't think of the name or find it on-line as I write this. If I find it, I'll update the post... These are my signs of old age coming through, or paint fumes... Not sure which one...
I bought stemware holders and new hardware from Lowes. The glassware holders are screwed into the top shelf, which is solid wood. There are four mirrors- one on each side and row, which I purchased at walmart. You can't really see them in the pictures but it does make a difference when you see it in person.
Now, I have a grown up place to make my cocktails... Come on over and have a drink!
Cost
So... it wasn't as "cheap" as I thought it would be to repaint furniture. I guess now that I have the supplies the next piece I do will be even more economical. I'm excited for flea market season to start.... I'm sure there were things I could have done to make this even less expensive, but for my first try- I'm o.k. with it!
Paint $17
Wax $20
Paint Brush- $18
Ceramic Signs $43 (My big splurge- I just feel in love with them...)
Stemware Holders $7
Scrapbook Paper $7
Mirrors $12
Hardware $28
Total $152
The original piece of furniture had doors on the top row. For some unknown reason I didn't take a "before" picture ... I think I was just excited to get started!
Painting the Furniture
I used the techniques of painting furniture from the Vintage Store House. I really liked Kelsey's explanations- She is really nice and encouraging! I pretty much followed everything she said.
Here is the link:
http://www.vintagestorehouse.com/diy-furniture/how-i-paint-furniture/tutorial-how-to-eliminate-brush-strokes-on-furniture/
I used everything she uses in her tutorial Sherwin Williams Paint, Vintage Store House Chalk Powered, Sherwin Williams Brush, Fiddes and Son's wax...
I'm not sure the wax finish did much... I don't really see a difference but I did it anyway. Maybe over time it will be come evident why you need to do that step.
Back Board
The back of the cabinet was my most perplexing challenge. The two boards in the back were held together with a piece of plastic leaving about a 1/4 gap. I tried to shimmy a piece of wood in between but it wasn't flat. So I decided to cut up some black poster board I had and make two panels to fit into each level. I used scrapbooking paper to decorate the boards. I'm holding them in place by double sided tape so If I want to change the look of the bar I can... I'm sure I won't, but the option is there....
Finishes
I bought the Signs Drink, Love, Cocktails from a great store in Philly. I walk by it when I'm roaming the city but can't think of the name or find it on-line as I write this. If I find it, I'll update the post... These are my signs of old age coming through, or paint fumes... Not sure which one...
I bought stemware holders and new hardware from Lowes. The glassware holders are screwed into the top shelf, which is solid wood. There are four mirrors- one on each side and row, which I purchased at walmart. You can't really see them in the pictures but it does make a difference when you see it in person.
Now, I have a grown up place to make my cocktails... Come on over and have a drink!
Cost
So... it wasn't as "cheap" as I thought it would be to repaint furniture. I guess now that I have the supplies the next piece I do will be even more economical. I'm excited for flea market season to start.... I'm sure there were things I could have done to make this even less expensive, but for my first try- I'm o.k. with it!
Paint $17
Wax $20
Paint Brush- $18
Ceramic Signs $43 (My big splurge- I just feel in love with them...)
Stemware Holders $7
Scrapbook Paper $7
Mirrors $12
Hardware $28
Total $152
Sunday, March 22, 2015
Titanic birthday
Saturday, March 14, 2015
Drunk Barbie Cake
Happy Birthday to My cousin Lauren. I can't believe you are 21!
There are a number of drunk barbie cake ideas on Pinterest, I personalized it by adding Lauren's boyfriend as the action hero coming in to help as his girlfriend is puking sprinkles into the fondant toilet.... Fun!
Light her up!
Labels:
21st Birthday,
Drunk Barbie,
Sprinkles
Monday, February 9, 2015
Maleficent Birthday
Lilly Turns 11 Years Old Today... She had a Maleficent Inspired Party, which was lots of fun. Happy Birthday Lilly!!!
We got to See Maleficent when we were in Disney in December... She is one scary lady...
Saturday, January 17, 2015
Surprise inside Cake
I used the twice baked method for the letters- It was cake mixed with frosting to a playdough consistency. I then cut 30 of each letter.
Here are the letters all lined us. You place the cake batter all around to fill in so when it baked it envelopes the letters.
Since it was a sprinkle I had to have sprinkles inside and outside of the cake. I also had sprinkles in every corner of my kitchen after it was all done... :)
The end result... So exited that it worked!
Labels:
Baby Shower Cake,
Heart,
Sprinkle,
Surprise Inside
Thursday, December 25, 2014
Disney and Christmas Cookies 2014
Labels:
Christmas Cookies,
Disney,
Elf on the Shelf,
Mickey,
Royal Icing,
Sugar Cookies
Sunday, November 9, 2014
Tractor with Cheese
My Nephew asked for a Tractor pulling a wagon filled with CHEESE! He loves' Cheese so that is what he got... The tractor is made from rice krispie treats and covered with fondant. Here he is enjoying some of his cheese...
Such a cute Pirate!!!
Subscribe to:
Posts (Atom)